We were asked on FaceBook if it was possible to define a favicon to a HTML help build generated by HelpNDoc. This is a great question and the short answer is yes, absolutely, thanks to HelpNDoc’s powerful template system. Let’s see how this can be done by first creating our favicon, then our own custom template which will use that favicon.
Create a cross-browser compatible favicon
Most web-browsers will be able to use PNG image files for the favicon. This is not the case for Internet Explorer, phones or tablets. Let’s prepare those icon files.
Here are the main icon file formats we will need to prepare in order to make sure we support as many web-browsers as possible:
- favicon.ico: This is an ICO file for Internet Explorer. This file should contain at least 16x16 pixels and 32x32 pixels icons. A great resource to create ICO files is the free X-Icon Editor
- favicon.png: This is a high resolution version of the favicon.ico file. This will be used by all other web-browsers and its size should be at least 64x64 pixels as they will automatically be resized when needed
Nowadays, it is not uncommon for readers of your HTML documentation to pin it to their tablets or phones and use them as an app. It is therefore recommended that you create specific icons to make sure it will look as good as possible on any device. As this is not the purpose of this article, we encourage you to review Mathias Bynens’ frequently updated blog post “Everything you always wanted to know about touch icons” to learn more about different devices and icon sizes.
The same can be said for Windows 8 Metro UI tiles.
Create a new HelpNDoc template
Now that our favicon images are ready, we’ll need to create a new HTML template so that we can modify it and add our favicon. We will use the default HTML template as a starting base.
It is strongly recommended that you never edit HelpNDoc’s standard templates: those are the templates bundled with HelpNDoc and which are subject to change with every new release. It is easy enough to create a new template based on the default ones. Here is how this can be done:
- Locate HelpNDoc’s installation directory. Usually this is “C:\Program Files\IBE Software\HelpNDoc” or “C:\Program Files (x86)\IBE Software\HelpNDoc”
- Inside HelpNDoc’s installation directory, there is the default HTML template we need to copy. Locate and copy that directory: “templates\html\default”
- Paste that directory in your custom HTML template directory. This usually is “My Documents\HelpNDoc\Templates\html”
- To make sure this template is unique we need to first rename the pasted directory: from “default” to “favicon” for example
- We also need to edit the “template.info” file in that directory to change “name=Default HTML Template” to “name=favicon template” for example
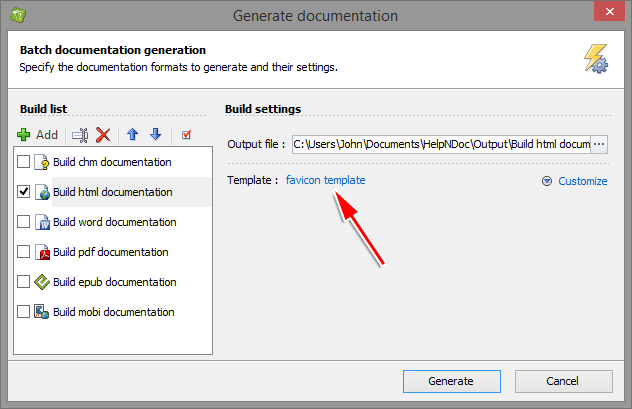
And we’re done. HelpNDoc will now recognize that template and display it in the “Generate Documentation” window. We can now modify it to add our favicon.
Adding a favicon to our newly created template
Now that the template is ready to be modified, we will need to make a few modifications to be able to add our favicon.
There are two steps involved to update that newly created template and add our favicon.
First we need to copy the previously created favicon in the “assets” sub-folder of that template. The “assets” sub-folder will be exported as-is by HelpNDoc within the root of your final documentation so this is where you can place any baggage files such as CSS, Javascript and favicon files.
Then, we need to edit the “index.pas.html” file to add links to our favicon. Simply add the following code before the HTML tag in that file:
<link rel="icon" href="favicon.png">
<!--[if IE]>
	<link rel="shortcut icon" href="favicon.ico" type="image/vnd.microsoft.icon" />
<![endif]-->
And that’s it! You can now generate your HTML documentation after making sure you have selected the newly created template: it will display the favicon in all web-browsers as expected.
Note: Internet Explorer might not display the favicon if you view your HTML documentation locally. You’ll need to upload it to you web-server first. Other web-browsers do not have that limitation.