HelpNDoc includes a very powerful template processor where you can customize any part of the generated documentation. Most of the time, you’ll use the default template of the documentation format you’d like to customize as a starting point. But when a new version of HelpNDoc is released, the default template might have evolved with new features and fixes, and you might want to include those changes in your custom templates. The solution is to compare and merge the updated default template with your own one. Let’s see one way to painlessly and reliably achieve this task.
Locating templates on the hard drive
Before comparing them, we first need to locate both the default and custom templates on the hard drive.
The default templates are located in HelpNDoc’s installation directory, in the “templates” sub-directory. Based on your system, this usually is either:
C:\Program Files\IBE Software\HelpNDoc 5\Templates\C:\Program Files (x86)\IBE Software\HelpNDoc 5\Templates\
The custom templates’ default path is in “My Documents\HelpNDoc\Templates\”. It can be customized in HelpNDoc’s options dialog by clicking “File”, then “Options”, then “Custom paths” and reviewing the “Templates path” option.
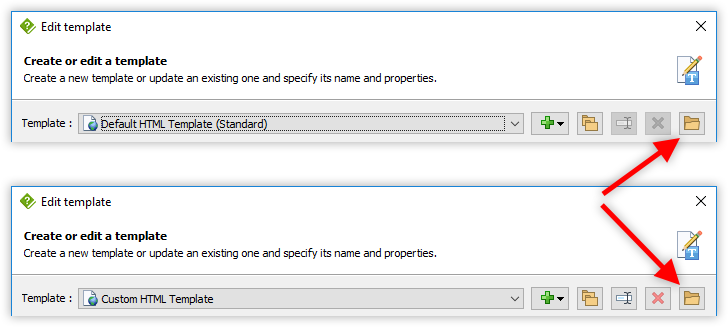
Starting with HelpNDoc 5.8, the template editor can be used to quickly open a template’s folder:
- From HelpNDoc’s “Tools” ribbon bar item, click “Template Editor”
- Select the template that you’d like to locate in the list
- Click the “Open template location” button to open its location in Windows Explorer
Comparing both templates
Manually comparing files and folders can be a lengthy and error-prone process. Fortunately, some software are available to perform that task easily and reliably.
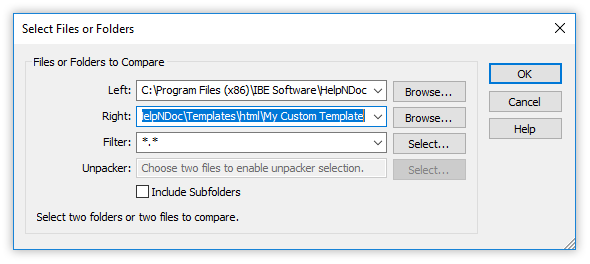
One possible solution is to use a software such as the free WinMerge to find the differences between your own template and the default one. Once both templates have been located:
- Open WinMerge
- Drag and drop the default template folder on the WinMerge window. This will be the “Left” project
- Drag and drop the custom template folder on the “Right” field of the WinMerge window
- Click “OK”
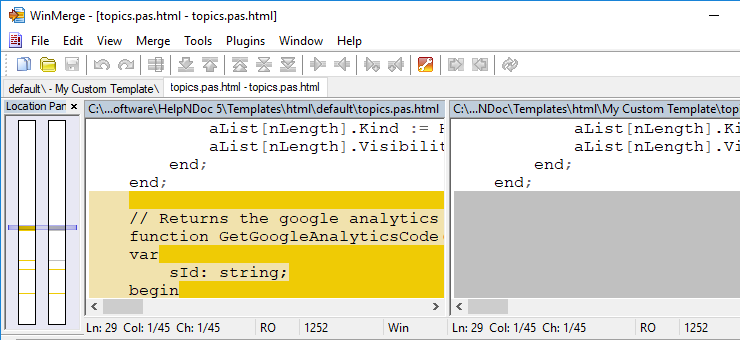
WinMerge can then be used to rapidly and reliably compare files and folders, and include the required modifications by copying the left part to the right when needed.
To learn more about WinMerge, you can check the project’s documentation and to start creating amazing documentation and help files, download the free HelpNDoc help authoring tool now.
See also...
Master Your Documentation Structure with HelpNDoc's Powerful Table of Contents Editor
At the heart of every documentation project lies HelpNDoc’s Table of Contents (TOC) editor, a deceptively simple yet incredibly powerful tool designed to streamline content organization and increase …
Read More →
Mastering Content Updates with HelpNDoc's Search and Replace Tools for Technical Writers
Are you tired of the constant struggle to keep documentation consistent, up-to-date, and error-free? For technical writers and content authors, managing these challenges can be a daunting task. …
Read More →
Transform Your Classroom with HelpNDoc: The Ultimate Back-to-School Tool for Teachers and Students
As the back-to-school season approaches, educators and students are on the lookout for tools that can simplify content creation, improve collaboration, and enhance the overall learning experience. One …
Read More →
How to Customize the Initial Position and Size of CHM Help Files
Creating CHM (Compiled HTML Help) files with HelpNDoc is a breeze, thanks to its user-friendly interface and powerful features. In this article we’ll look into the specifics of how you can set the …
Read More →