The recent release of HelpNDoc 6.4 includes an enhanced single page HTML template with the ability to optionally add a table of contents to the produced single page HTML documentation. We obviously used HelpNDoc’s powerful template editor to modify the single page template and we thought it might be a good idea to document this process for learning purposes. Follow the steps described in this article to learn how you can create and alter HTML-based documentation templates using HelpNDoc’s build-in tools.
Using the template editor to create a new template
The HTML documentation files generated by HelpNDoc can be fully customized thanks to the powerful integrated template editor. Let’s see how we can access it and create a new template.
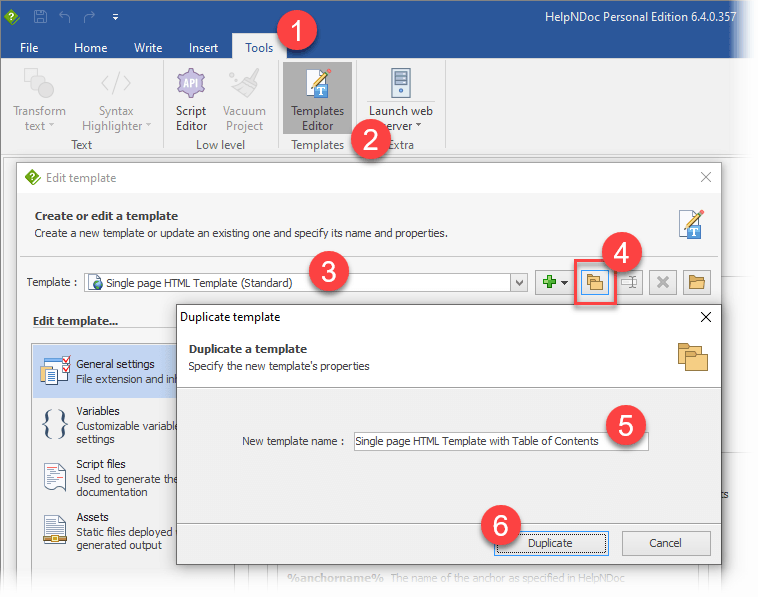
Accessing the template editor is very straightforward: from HelpNDoc’s “Tools” ribbon tab, click the “Template Editor” button to launch it.
As we’d like to create a new template based on the “Single page HTML Template”, we’ll need to duplicate it first:
- In the “Template” list, select the “Single page HTML Template (Standard)” item
- Click the “Duplicate template” button
- Enter the new template’s name
This will create a new template which is identical to the “Single page HTML Template”.
Add custom variables to the newly created template
Some users might prefer their HTML documentation to be generated without a table of contents. Fortunately, templates can include variables to configure their behavior right from within HelpNDoc’s user interface.
Template authors can define variables and use their value to control how the template will behave based on user feedback. HelpNDoc lists all available variables for a specific template in the build window, providing an easy to use interface to customize the template.
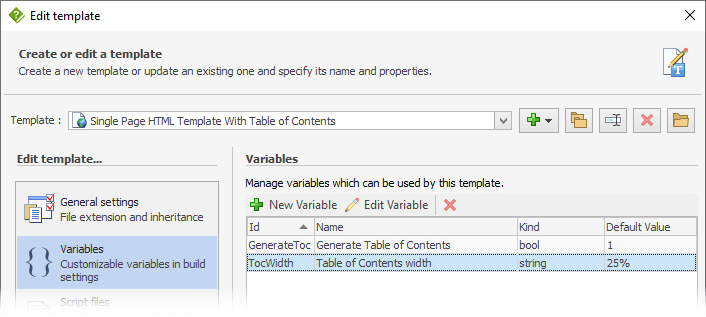
Let’s create two variables to control the visibility of the table of contents and its width:
- In the template editor, make sure that the newly created template is selected in the “Template” list
- Go to the “Variables” section
- Click “New Variable”
- Specify the following properties to create a
booleanvariable which will control the visibility of the table of contents:- Id: “GenerateToc”
- Name: “Generate Table of Contents”
- Description: “If checked, a table of contents will be generated”
- Kind: “bool”
- Default value: “1”
- Click “Save”
- Click “New Variable” again
- Specify the following properties to create a
stringvariable which will control the size of the table of contents:- Id: “TocWidth”
- Name: “Table of Contents Width”
- Description: “Width of the table of contents. Can be pixels, percent…”
- Kind: “string”
- Default value: “25%”
- Click “Save”
Both variables are now created and accessible from both the template’s code for execution, and HelpNDoc’s build dialog for customization.
Edit the template’s script to add the table of contents
Script files control the behavior of the template. Scripts include a mix of HTML and Pascal programming languages to control how the final documentation is generated.
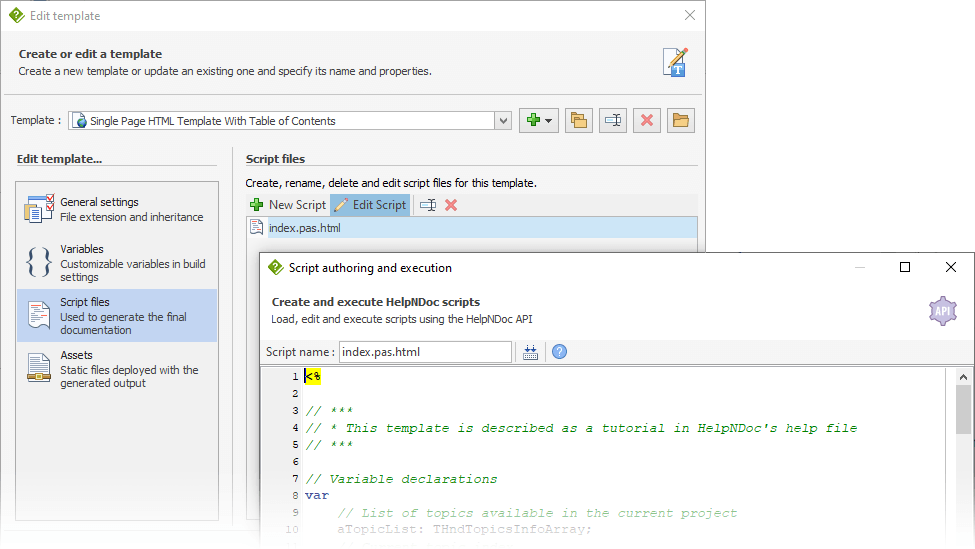
This template only includes a single script which controls the generation of the whole HTML documentation. To edit this script:
- In the template editor, make sure that the newly created template is selected in the “Template” list
- Go to the “Script files” section
- Select the “index.pas.html” script
- Click the “Edit Script” button to launch HelpNDoc’s built-in script editor
Let’s first add some CSS styles to customize the look and feel of the generated table of contents. Within the <style type="text/css"> tag, add the following code. Notice how it is included in a conditional statement so that it is only generated when the “GenerateToc” variable is set to “True” from within HelpNDoc’s build window, and how the “TocWidth” variable is used to similarly define the table of content’s width:
<%
    if HndGeneratorInfo.GetCustomSettingValue('GenerateToc') then
    begin
%>

    body {
        align-items: stretch;
        display: flex;
        flex-direction: row;
        flex-wrap: nowrap;
        overflow: hidden;
        margin: 0;
        padding: 0;
    }

    .toc {
        height: 100vh;
        flex: 0 0 <% print(HndGeneratorInfo.GetCustomSettingValue('TocWidth')); %>;
        overflow: auto;
    }

    .content {
        height: 100vh;
        overflow: auto;
    }

    .toc-inner, .content-inner {
        margin: 1em;
    }

    .toc-inner a {
        display: block;
        padding: 0.5em 0 0.5em 0;
        text-decoration: none;
        color: #000;
        font-size: 11pt;
        font-family: 'Segoe UI';
    }

    .toc-inner a:hover {
        background-color: #ddd;
    }

    .toc-inner a.toclevel-2 { padding-left: 1em }
    .toc-inner a.toclevel-3 { padding-left: 2em }
    .toc-inner a.toclevel-4 { padding-left: 3em }
    .toc-inner a.toclevel-5 { padding-left: 4em }
    .toc-inner a.toclevel-6 { padding-left: 5em }
    .toc-inner a.toclevel-7 { padding-left: 6em }
    .toc-inner a.toclevel-8 { padding-left: 7em }
    .toc-inner a.toclevel-9 { padding-left: 8em }
<%
    end;
%>
We can now add the code which will produce the HTML table of contents. Right after the <body> tag, we can add the following code which will iterate through every topic in the project:
<%
    if HndGeneratorInfo.GetCustomSettingValue('GenerateToc') then
    begin
%>
<div class="toc">
    <div class="toc-inner">
        <%
            // Loop through all the topics
            for nCurTopic := 0 to length(aTopicList) - 1 do
            begin
                // Get the topic level
                nTopicLevel := HndTopics.GetTopicLevel(aTopicList[nCurTopic].Id);
                // Add the topic title
                printf(
                    '<a href="#%s" class="toclevel-%d">%s</a>',
                    [aTopicList[nCurTopic].HelpId, nTopicLevel, aTopicList[nCurTopic].caption]
                );
            end;
        %>
    </div>
</div>
<%
    end;
%>

<div class="content">
    <div class="content-inner">
And let’s not forget to close the <div> elements that we created. Right before the </body> tag, we can add:
    </div>
</div>
Use the template to build the HTML documentation
Our newly created template is now ready. It can be used to produce HTML documentation from HelpNDoc’s “Generate documentation” window.
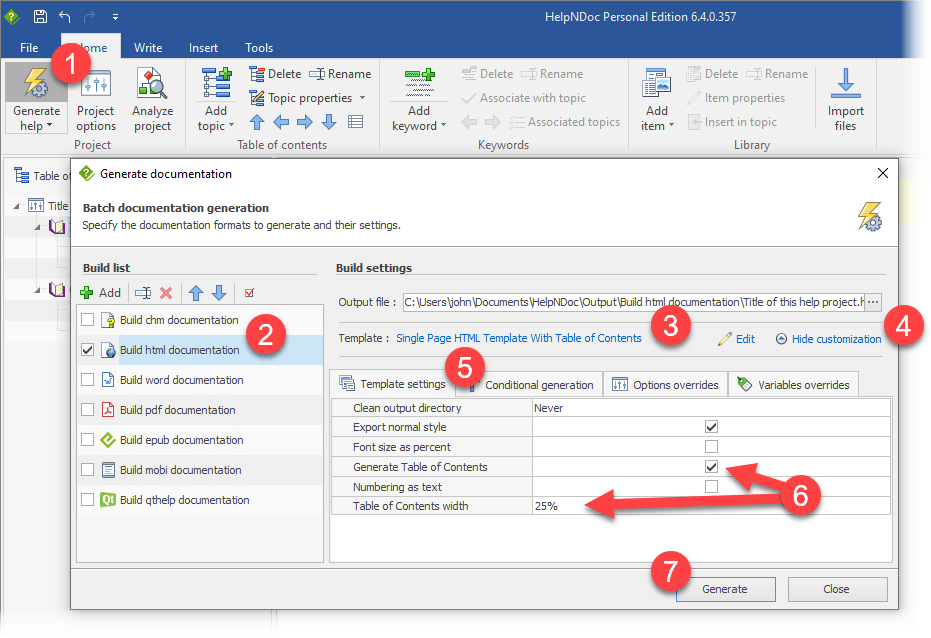
To use our template, we’ll need to assign it to an HTML build:
- Open a documentation project in HelpNDoc or create a new one
- From HelpNDoc’s “Home” ribbon tab, in the “Project” group, click the top part of the “Generate help” button to show the “Generate documentation” window
- Select the HTML build in the list on the left and make sure that it is checked for generation
- On the right, click the “Default HTML Template” link and select the newly created template in the list
- Click “Customize” if the “Template settings” tab is not already visible
- In the “Template settings” tab, make sure that both the “Generate Table of Contents” and “Table of Contents width” are correctly set up. Those are the variables that we defined earlier in the template editor
- Click “Generate”
And voilà! HelpNDoc’s generated HTML documentation now includes a table of contents and this template can be reused to any number of documentation projects created in HelpNDoc.
Thanks to this very powerful template system, the HelpNDoc help and documentation authoring environment can be customized to produce truly unique HTML documentation web-sites. HelpNDoc’s template editor and available API methods provide plenty of opportunities to imagine and produce astonishing and tailored documentation files for various supports and audiences.
Feel free to download HelpNDoc now, navigate to its installation directory to review the full source code of the bundled templates, and check the template documentation pages to learn more about their capabilities.
See also...
![HelpNDoc's character analyzer illustration [illustration] [Featured]](/news-and-articles/2024-03-07-tech-writers-secret-weapon-the-unique-advantages-of-using-helpndocs-characters-analyzer/images/helpndoc-character-analyzer-illustration_huebbfad1edfa8e198fe68a27ac6a615ca_819807_500x280_fit_q75_box.jpg)
Tech Writers' Secret Weapon: The Unique Advantages of Using HelpNDoc's Characters Analyzer
HelpNDoc has been a go-to solution for professionals seeking to create high-quality, engaging, and user-friendly documentation. However, it’s not just its user-friendly interface or its versatile …
Read More →![Happy technical writer using HelpNDoc [happy] [Featured]](/news-and-articles/2024-01-17-making-the-most-of-helpndoc-how-the-keep-temporary-files-feature-can-benefit-technical-writers/images/happy-technical-writer-using-helpndoc_huebbfad1edfa8e198fe68a27ac6a615ca_338910_500x280_fit_q75_box.jpg)
Making the Most of HelpNDoc: How the "Keep Temporary Files" Feature Can Benefit Technical Writers
When working on technical documentation, every tool and feature at our disposal can make a big difference in productivity and efficiency. One such feature in HelpNDoc, often underutilized, is the …
Read More →![Converting Legacy WinHelp HLP to Modern Documentation [converting] [Featured]](/news-and-articles/2023-10-31-revitalize-your-help-files-converting-legacy-winhelp-hlp-to-modern-documentation-with-helpndoc/images/_huebbfad1edfa8e198fe68a27ac6a615ca_422230_8d1bdb26d0c0e24a9ba8baded3ca5c23.jpg)
Revitalize Your Help Files: Converting Legacy WinHelp HLP to Modern Documentation with HelpNDoc
In an age where information is consumed on a plethora of devices and platforms, the classic WinHelp HLP files — once the standard in Windows-based help documentation — are now relics of a bygone era. …
Read More →![HelpNDoc vs WordPress [versus] [Featured]](/news-and-articles/2023-08-15-mastering-multi-channel-publishing-why-helpndoc-leaves-wordpress-in-the-dust/images/helpndoc-vs-wordpress_hu0bdadae9c10011a35eade903242deaee_146355_500x280_fit_box_3.png)
Mastering Multi-Channel Publishing: Why HelpNDoc Leaves WordPress in the Dust
In today’s interconnected digital world, the concept of multi-channel publishing has become more critical than ever. As audiences seek information through various platforms and formats, content …
Read More →