Technical writers can use a special robots.txt file or define robots meta tags in their HTML documentation to specify how popular search engines, such as Google or Bing, should index and serve individual pages in search results. In this article, we will see how we can update the default HTML template provided by the HelpNDoc help authoring tool to generate a robots.txt file, specify a project-wide default value for the robots meta tag, and override its content on specific documentation pages. It is inspired by code provided by Keith Phillips, a HelpNDoc user whom we would like to thank for his contribution.
Create a new HTML template
By creating a new template in HelpNDoc’s built-in template editor, we will be able to re-use it on any future and past documentation projects.
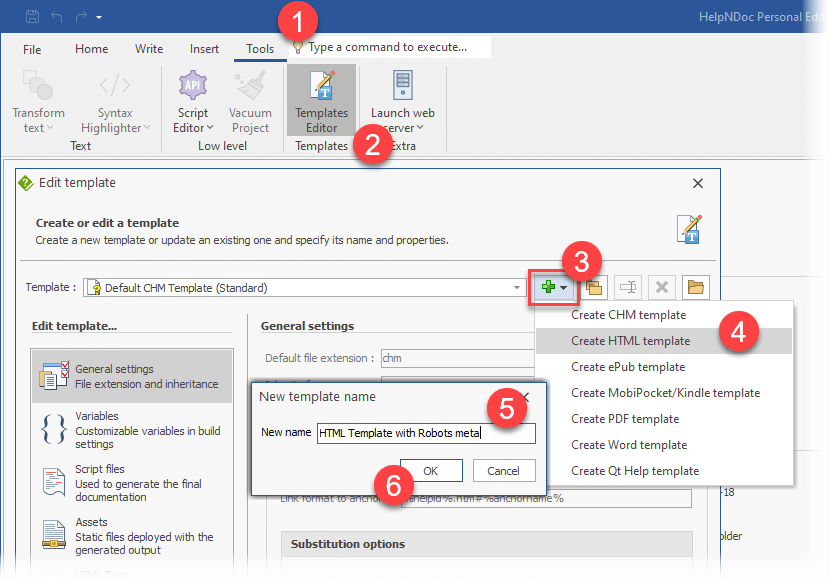
Creating a new HTML template based on the default one is very straightforward:
- From HelpNDoc’s “Tools” ribbon tab, click the “Templates Editor” button to launch the editor
- Click the “+” button
- Click “Create HTML template”
- Enter the new template’s name. We’ll use “HTML Template with Robots meta” in this article
This creates a new HTML template which is identical to the default HTML template provided by HelpNDoc. We can now customize it.
Add a robots.txt file to the template
We can add a static robots.txt file to the template: it will be exported as-is when the HTML documentation is generated, and parsed by search engines when crawled.
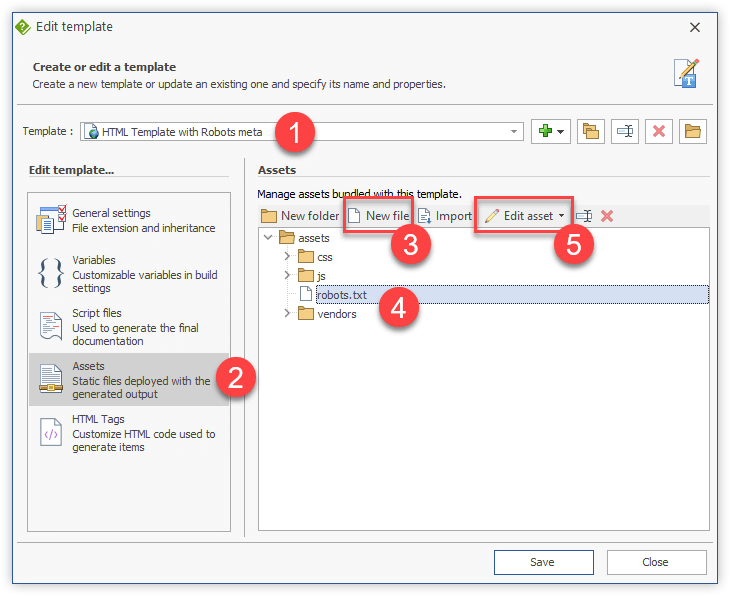
From HelpNDoc’s template editor, select the newly created template, then navigate to the “Assets” section. We can now create the robots.txt file as follows:
- Click “New file”
- Name it “robots.txt”
- Select it then click “Edit asset” to open your default text editor
- Enter the desired content of your robots.txt file (check Google’s guidelines to learn more). For example, we can allow every search engine to crawl and index every page using:
User-agent: *
Allow: /- Save that file and close the text editor
- In HelpNDoc, click “Finish Editing”
- Click “Save” to save the newly created template
From now on, builds using this template will automatically generate this robots.txt file in the same directory as the generated documentation.
Alternative: add a template variable to define the default Robots meta tag value
As an alternative to the robots.txt asset, we can create a template variable to specify the default value of the Robots meta tag that will be added in the generated HTML document’s head section.
1. Create a new variable
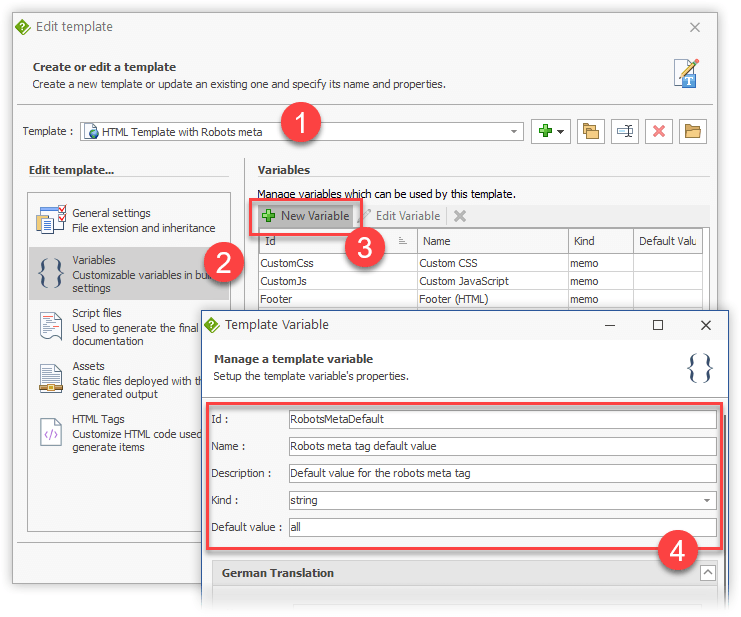
From HelpNDoc’s template editor, select the newly created template, then navigate to the “Variables” section. We can now create a new default meta tag variable:
- Click “New Variable”
- In the variable editor window, specify its settings:
Id: RobotsMetaDefaultName: Robots meta tag default valueDescription: Default value for the robots meta tagKind: stringDefault value: all
- Click “Save” to save the newly added variable
2. Use the variable in the generated HTML pages
Once the variable has been created, we can use it in one of the template’s script file. Here is how to proceed:
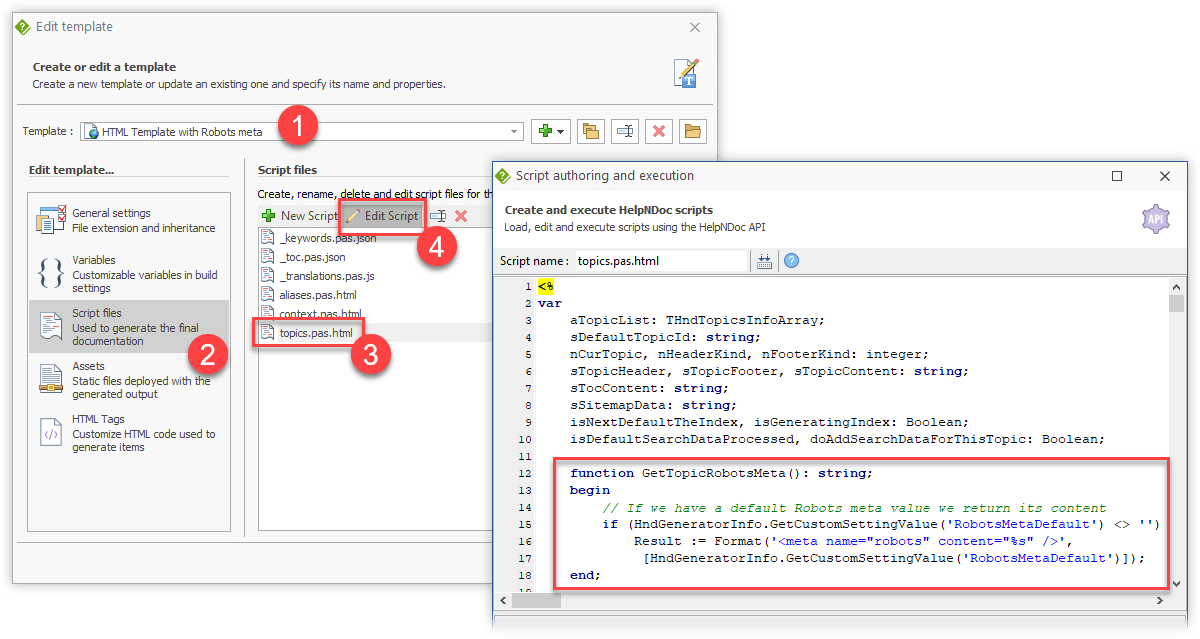
- Navigate to the “Script files” section
- Select the “topics.pas.html” file, which is the one used to produce each topic’s HTML content
- Click “Edit Script”
- After the variables declaration section, add the following function:
function GetTopicRobotsMeta(): string;
begin
    // If we have a default Robots meta value we return its content
    if (HndGeneratorInfo.GetCustomSettingValue('RobotsMetaDefault') <> '') then
        Result := Format('<meta name="robots" content="%s" />', [HndGeneratorInfo.GetCustomSettingValue('RobotsMetaDefault')]);
end;- Scroll down to the
<head>section in that file, then add a call to that function to output the meta content:
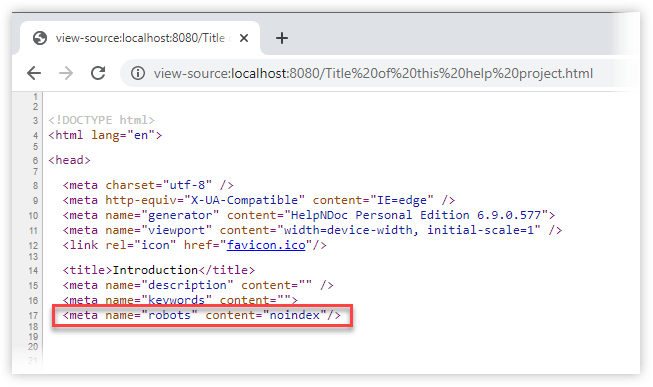
<% print(GetTopicRobotsMeta()); %>From now on, if the Robots meta tag default value is defined in a build’s settings, it will be used to produce the meta tag for all pages generated for this project.
Use topic properties to override the default value for some pages
To make the template as flexible as possible, we can leverage topic properties to override the default Robots meta tag value for some specific topics.
1. Handle topic properties in the template
We first need to update our GetTopicRobotsMeta function to check if a specific topic has an overridden value in its topic properties. In HelpNDoc’s template editor:
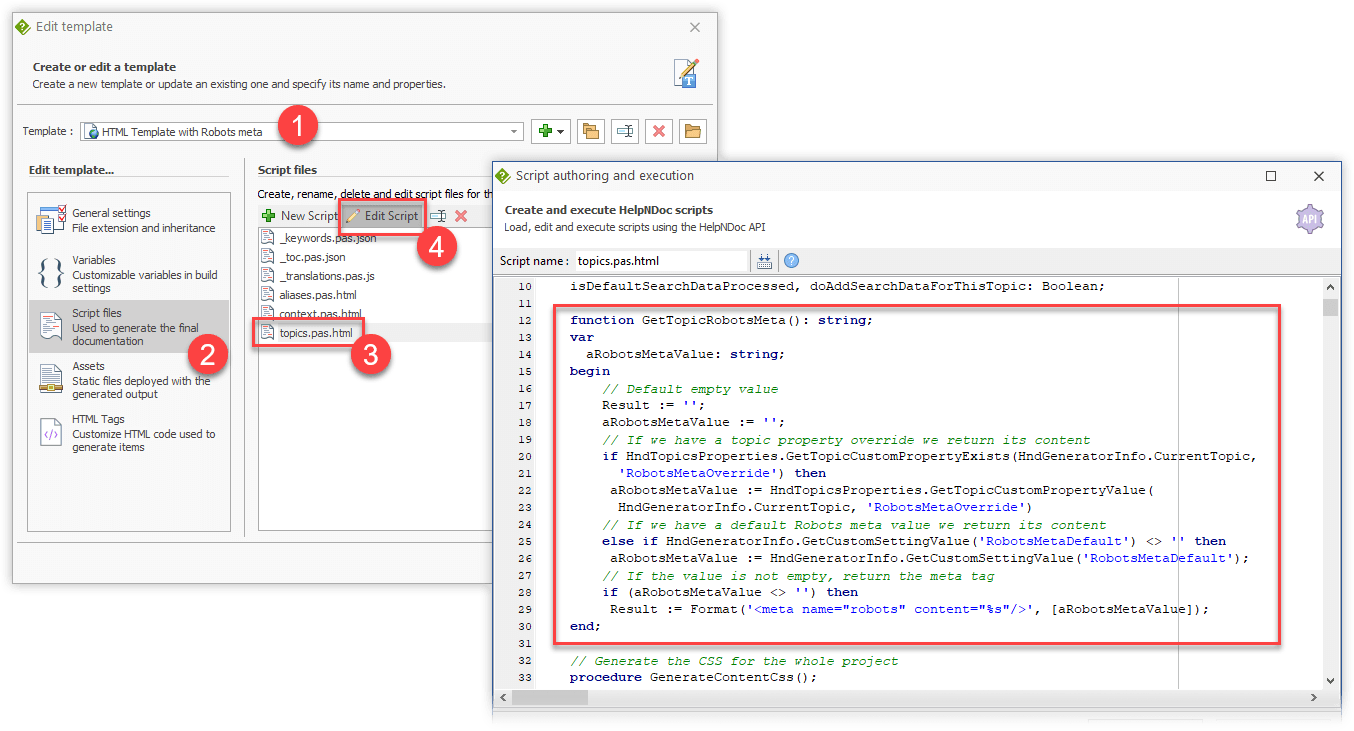
- Navigate to the “Script files” section
- Select the “topics.pas.html” file, which is the one used to produce each topic’s HTML content
- Click “Edit Script”
- Replace the previously created
GetTopicRobotsMetafunction with this one:
function GetTopicRobotsMeta(): string;
var
    aRobotsMetaValue: string;
begin
    // Default empty value
    Result := '';
    aRobotsMetaValue := '';
    // If we have a topic property override we return its content
    if HndTopicsProperties.GetTopicCustomPropertyExists(HndGeneratorInfo.CurrentTopic, 'RobotsMetaOverride') then
        aRobotsMetaValue := HndTopicsProperties.GetTopicCustomPropertyValue(HndGeneratorInfo.CurrentTopic, 'RobotsMetaOverride')
    // If we have a default Robots meta value we return its content
    else if (HndGeneratorInfo.GetCustomSettingValue('RobotsMetaDefault') <> '') then
        aRobotsMetaValue := HndGeneratorInfo.GetCustomSettingValue('RobotsMetaDefault');
    // If the value is not empty, return the meta tag
    if (aRobotsMetaValue <> '') then
        Result := Format('<meta name="robots" content="%s"/>', [aRobotsMetaValue]);
end;- Click “Save” to save the script file
- Click “Save” to save the template
2. Override the robots meta tag value for some topics
Now that the template is in place, we can simply override the default robots meta tag value for some topics as follows:
- In HelpNDoc’s table of contents editor, navigate to the desired topic
- In the “Topic properties” panel, click the “+” icon to create a new custom property
- Specify its name: “RobotsMetaOverride”
- Click “OK”
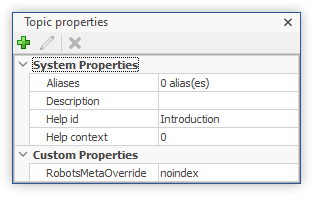
- In the “Topic properties” panel, select and edit the value of the newly created custom property. For example:
noindexto hide this page from search results
Use the newly created template to produce the final HTML documentation
Everything is now in place to produce the final documentation with the newly created template. We simply need to select it for the desired HTML build.
The newly create template can now be used by any HTML build in any HelpNDoc project. Here is how to proceed:
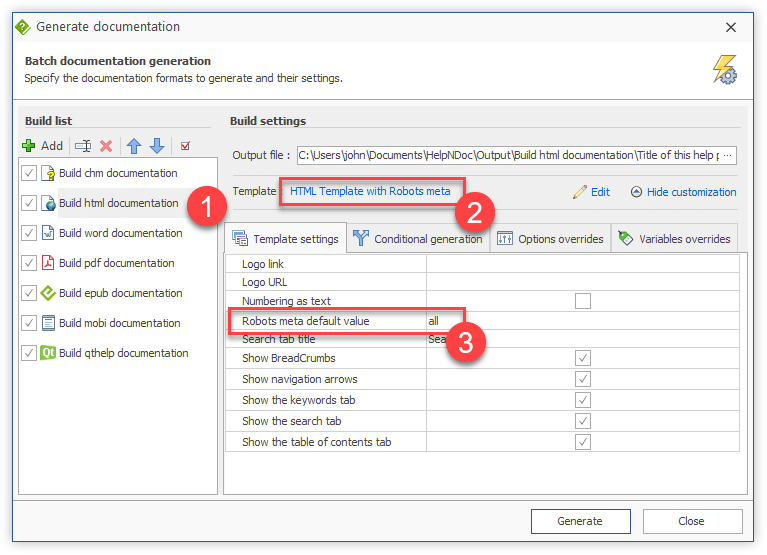
- From HelpNDoc’s “Home” ribbon tab, in the “Project” group, click the top part of the “Generate help” button
- Select the HTML build in the list
- Change the template to the newly created “HTML Template with Robots meta” by clicking the currently selected template’s name
- Click “Generate” to build the final documentation
In order to customize the default value of the robots meta tag, this can be done from the same dialog:
- Click “Customize” if the “Template settings” tab is not already visible
- In the “Template settings” tab, locate the “Robots meta default value” setting
- Change its value
- Click “Generate” to build the updated final documentation: every HTML page will contain the new default value if not overridden for a specific topic
Thanks to HelpNDoc’s very powerful template system and customization capabilities, we can greatly customize the generated HTML documentation’s look and feel and optimize it for Search Engine Optimization (SEO) purposes. You can download your free copy of HelpNDoc now to test it for yourself for as long as needed.